Yoga for Performancesm: Runners’ Sequence, Part 1
The Yoga for Performancesm program offers a specialized sequence of poses designed to meet the needs of athletes engaged in specific sports. For instance, the following sequence is created particularly with runners in mind, and addresses the physical demands of that sport. Future articles will offer sequences that are tailored to golfers, bicyclists, tennis players, skiers, and other athletes.
Each sport has unique target zones, and our sequences are created to open, stretch and/or strengthen those zones. We also suggest yoga exercises or poses (asanas) to help you warm up, cool down, and better recover from your activities. The program not only addresses your physical needs as an athlete but other aspects, such as centering, breath control (pranayama), and meditation, that can elevate your performance. Because the benefits of yoga extend far beyond our physical practice, future articles will suggest yoga poses in sequences designed to help us in other ways: to recover from a stressful day, to fight a cold, to ease the discomfort of headaches, backaches, even poses to do right at your desk to keep your mind clear and the body awake.
Our yoga sequences follow a natural flow. From a place of inactivity, our body’s innate wisdom desires a warm-up to lead us safely to the core work of the practice, and then a sufficient cool down. Earlier, we introduced you to five poses that are ideal to use in the beginning of all sequences. We start with poses like these because they draw us into our yoga practice—slow movements that can easily be coordinated with the breath, bringing awareness into the body. Sensing body and breath as one allows us to shift from the busyness of the day into the present moment on the mat. These poses also create postural awareness as well as enhance the mobility of the entire spine. More fiery vigorous standing poses typically come next, to thoroughly heat up the body as well as increase respiration and circulation. The last part of a sequence consists of cooling poses that create more introspection and internal quiet, allowing us to wind down, then settle into savasana.
Runners’ Sequence (Part 1)
As noted in an earlier article, “Yoga for the Right Balance,” as soon as I began practicing yoga, it was evident that it was a wonderful complement to running. On one hand, running promotes good endurance for the yoga exercises as the body becomes more stable and strong, allowing one to practice yoga with more stamina and a longer “breath.” At the same time, yoga stretching, relaxation and breathing exercises could improve running performance when integrated into your running program. Asanas are done slowly and in a manner that aligns the body and prevents injuries making them ideal for warming up or cooling down. Yoga asanas are also beneficial in speeding recovery from a workout as well as from injury. Yoga breathing exercises, or pranayama, promote greater energy and oxygen intake. This, coupled with the deep relaxation in the form of meditation can prepare one for competition, an upcoming training session or, on the other end of the spectrum, to simply wind down.
Because of the many benefits, it was only a matter of time before yoga became one of the primary supports for my running routine, alongside other traditional training methods like stabilization programs, swimming and biking. You may not think that the practice of yoga would complement the competitive nature of athletics, but it does. Yoga teaches focus, self-awareness and self-love. These lessons benefit the athlete—creating harmony from within. We can still be driven to train hard, but now we can also balance that with greater self-acceptance.
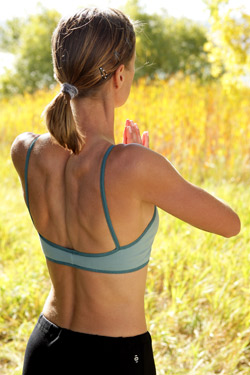
Runners of all levels need focus, endurance, patience, and inner strength to succeed in training and competition. They also need muscle flexibility, and the right body alignment for a relaxed and efficient running form. For these reasons, our sequence is designed to improve body alignment, stabilization and flexibility of the muscles and ligaments that are the main target zones for runners. The asanas I practice are focused on opening up medially rotated shoulders, loosening up tight psoas muscles, tight hips, hamstrings, calves, and Achilles–all with the goals to increase flexibility, improve strength, and enhance the ability for deeper breathing.
This sequence for runners has a similar flow of asanas as the ones I practice with our corporate clients who are recreational athletes, as well as with the KIMbia runners, who are some of the top runners in the world. As long as there is no discomfort or pain, I encourage you to enjoy learning this routine. You will be surprised how quickly your body will warm to this practice. No matter what your level of fitness, this sequence should be practiced only on your easy running days, those days between hard workouts. Whether you walk four days a week or run every day, this practice is most effective on low-impact days. To prevent injury, it is important to avoid stretching muscles that have been highly worked.
If you would like more information about my current yoga routine, see ” Yoga for the Right Balance.” The following Runners’ Sequence will be in two parts. Here, in this article, you can find Part 1. It consists of eight poses that are meant to build on the five poses we introduced to you in the “Introduction.” The “corpse pose” (savasana) will now move to the end of this sequence, as we always finish our practice with savasana. Part 2 will be the topic of my next article.
Poses: Runners’ Sequence (Part 1)
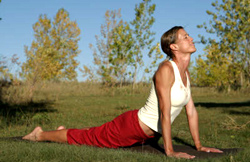
Upward Dog — Urdhva Mukha Svanasana
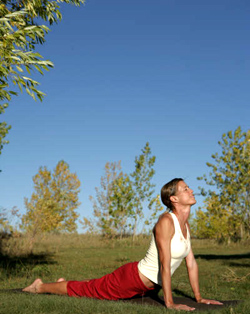
Benefits:
- When practiced with athletes, I gently talk them into this pose because their lower backs are often very stiff and stressed from their running workouts.
- Opens the chest and strengthens shoulders and wrists. Increases spinal flexibility and tones the back muscles.
How to:
- From Downward Dog inhale to plank pose (to get into Plank Pose balance your body on the toes and hands in one straight line-as if you are at the top of a push-up).
- Exhale and begin to lower your body to the floor keeping your body in a straight “plank” position, keeping the elbows close to the sides.
- Inhale, pulling your chest through and up, away from your hands until your arms are straight. Roll forward over your toes so the tops of the feet are resting in the floor.
- Allow the shoulders to softly roll back so the neck remains long. Keep the chest lifting forward and up. Tilt the head back gently and look up (unless there is discomfort in the neck). Hold for several breaths. To finish the pose gently lower to the floor or on an exhalation, lift the hips back into Downward Dog.
Gate Pose — Parighasana
Benefits:
- A wonderful lateral stretch for the torso and very welcome for this “not usually stretched” area.
- Strengthens the muscles of the waist, especially the external obliques. Engages the core. Working both sides increases the flow of prana, or life force.
How to:
- Kneel with the knees hip width apart and the tops of your toes on the floor.
- Inhale as you raise your arms to the sides at shoulder level with palms facing down, and stretch your right leg out to the side with your leg straight and pointing your right toes.
- Exhale, lengthen the torso as you curve to the right until your right hand reaches the right ankle.
- Keeping the body in one plane, stretch the left arm over your head towards the right. Turn the head to gaze upward from under the left arm. Hold for several breaths. Switch sides.
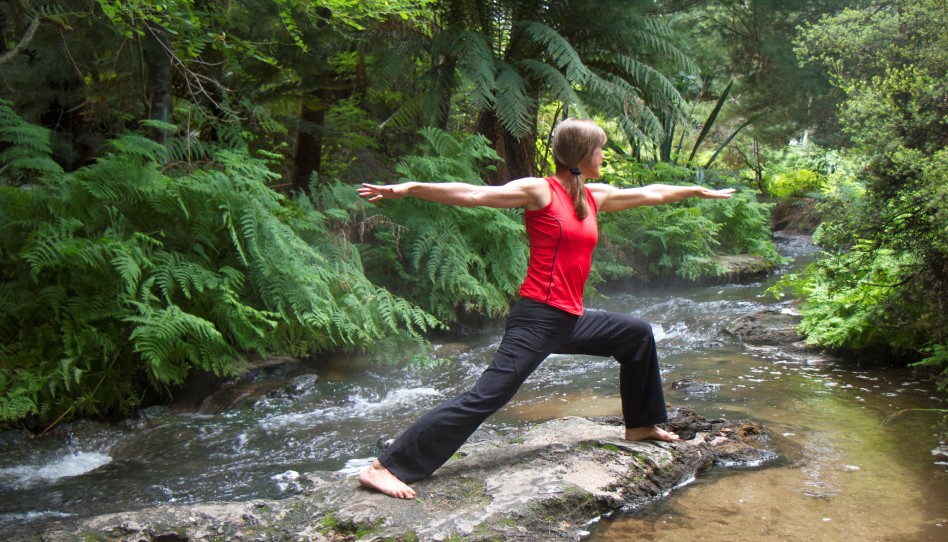
Warrior Two — Virabhadrasana II
Benefits:
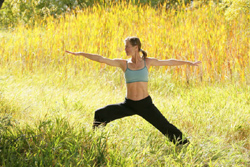
- This is one of the favorite poses of the KIMbia runners’ team. It is a wonderful asana to restore a feeling of power because it connects us with the integral power of the legs, which, linked with intention, propels us to action. The “warrior” character of this pose encourages the athletes to focus and concentrate.
- Strengthening for the hamstrings, and quadriceps. An ideal pose to practice right after an easy workout—it also stretches the adductor muscle and improves the function of the hips.
How to:
- Start in Mountain pose. Take a big step back with the left leg, the right foot stays straight ahead, the left foot turns slightly out about 15 degrees. The heel of the right foot should line up with the arch of the left foot. Ankles should line up under wrists (see foot position of “Triangle Pose”). You should feel comfortable and balanced.
- Inhale as you bring your arms up to shoulder level, palms facing down, right arm in front of you over right leg and left arm behind you. While you extend out through the fingers, soften the shoulders down. Turn your head to gaze at the middle finger of the right hand. Feel the sensation of power and focus on complete alignment of your arms and legs.
- Exhale as you bend the right knee—the goal is for the thigh to become parallel to the floor. Make sure the knee is directly over the ankle. At the same time, press strongly into the outer edge of the left foot to keep the back leg long and strait.
- Continue to breathe steadily as you hold your gaze. Silently (or not) say an inner “Ha!” to an imaginary foe or problem. Step back to Mountain pose and switch sides or simply switch the direction of the feet.
Triangle Pose — Trikonasana
Benefits:
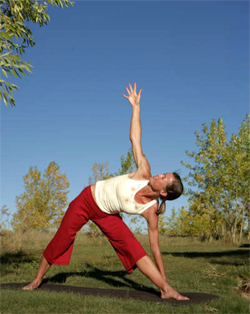
- A great pose to combine with Warrior II Pose. Our athletes like this combination and this “multi-stretch,” especially because it stretches the hamstring muscle and opens the chest for better breathing.
- Good for stretching the adductors and lateral torso. It also improves the flexibility of the hips as well as improving balance, concentration and breathing.
How to:
- Start in Mountain pose. Take a big step back with the right leg, the left foot stays straight ahead, the right foot turns slightly out about 15 degrees. The heel of the left foot should line up with the arch of the right foot. Ankles should line up under wrists.
- Inhale as you raise the arms out to shoulder level. While you extend out through the fingers, soften the shoulders down. Turn your head to gaze at the middle finger of the left hand.
- Exhale and extend the upper body to the left stretching the left hand and reach it as far down the front of the left leg as possible; more flexible people may be able to bring the fingers to the outside of the front foot. Find your balance and keep the back leg straight. Also, tighten the front leg to support the knee joint.
- Twist the torso towards the ceiling, lifting the right arm up. Continue to revolve the navel upward while allowing the torso to stay long and the body in one plane (imagine your whole torso pressed between 2 planes of glass). Inhale, allowing the left arm to lift you up. Feel the stretch and the extension of your entire body. At the same time, feel the focus and concentration of your mind. Breathe rhythmically. Step back to Mountain pose and switch sides or simply switch the direction of the feet.
Side Angle Pose — Parsvokanasana
Benefits:
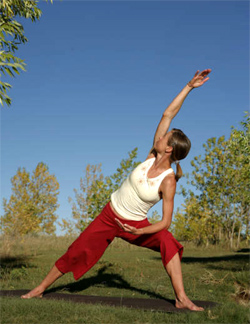
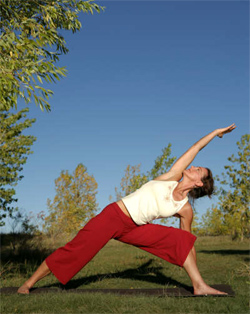
- This is a beautiful stretch in connection with Warrior II and Triangle pose. It tones and strengthens the leg muscles, strengthens the ankles and knee joints, as well as expands the chest, and stretches muscles of the arms, shoulders, and back.
- Encourages increased blood circulation to the spinal nerves and abdominal organs.
How to:
- Start in Mountain pose. Take a big step back with the right leg, the left foot stays straight ahead, the right foot turns slightly out about 15 degrees. The heel of the left foot should line up with the arch of the right foot. Ankles approximately under wrists.
- Inhale while lifting the arms out to shoulder level as you extend out through the fingers, soften the shoulders down.
- Keeping the shoulders and hips square, exhale and bend the left leg until the thigh is parallel to the floor with the arms straight and facing forward and back. Stretch to the left until your left elbow is resting on your thigh (see first photo) while the right arm comes up, pointing at the ceiling. Alternatively, for a deeper stretch, the left hand can touch the floor behind the left ankle (see second photo), while the right arm comes up.
- Keeping the right arm straight, stretch it over your head until it is almost touching your ear. Gently twist the navel upwards while you look up. Hold for several breaths.
- To come out, inhale as you let the left arm lift you up. Step back to Mountain pose and switch sides or simply switch the direction of the feet.
The Guy’s Stretch — Hip Flexor Stretch
Benefits:
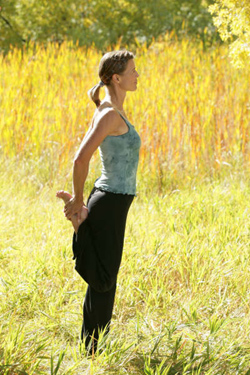
- We call this the “Guy’s stretch,” because our athletes love this stretching exercise on a daily basis. This is a great stretch before a hard workout, as well as after an easy run.
- This is an ideal stretch for several muscles including the hip flexors, quadriceps, psoas, abdominals as well as other muscles that help support an erect body posture. Because it is a balance pose it also improves focus and concentration.
How to:
- Stand in Mountain Pose. Breathe deeply through the nose and bring your awareness to the feet. Slowly shift your weight to the left leg. Bend your right knee by lifting your right heel up behind your back and take your right foot in both of your hands.
- Keep your body straight. Make sure your knees are close together. Slowly exhale.
- With your next inhalation open your chest by rolling your shoulders gently backwards, keep the right foot in both of your hands, gently tuck the tailbone forward.
- Feel the stretch in your right thigh and your abdominal muscles. You should find deep balance in this pose. Hold for several breaths, keeping your chest open. With an exhalation, release your foot, and repeat on the other side.
Runners’ Yoga Stretch
Benefits:
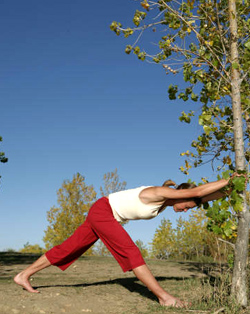
- This is one of my favorite exercises, and an ideal multi-stretch for those who have limited time. It is also a wonderful stretch right after an easy workout because it simultaneously stretches the hamstrings, calves, and Achilles tendons.
- This is also a great chest opener, releasing the shoulders and back, opening the pectorals and allowing for deeper breath.
How to:
- Stand one arm’s length from the wall and place the palms of both hands at shoulder height on the wall. Your middle finger should point straight towards the ceiling. From there, bend your torso halfway forward, while walking your feet back, and simultaneously walking your hands down the wall, until your spine is parallel to the floor.
- Step your right foot a short step forward; your left leg a short step backward; both feet pointing straight forward towards the wall.
- Keep both legs straight. This alone might be a challenging stretch. If you are experiencing too much tension, release it by slightly bending your right knee and lifting your left heel a little off the floor. Then, gently try again to straighten your right knee a bit more. You will feel the stretch in your right hamstring as well as your left calf and Achilles.
- Keep your spine parallel to the floor and your chest open by rolling the shoulders back gently. Also keep the hips parallel to the wall. Breathe equally and slowly. Release, switch the forward leg and repeat.
Updated November 10, 2018
Updated May 12, 2014
Updated November 13, 2012
- Posted October 6, 2013
Copyright © 2006-2026 Uta Pippig and Take The Magic Step®. All Rights Reserved.